Hardwood floors add timeless elegance, warmth, and long term value to any home. However, whether you have a bustling household with pets and kids or you recently rearranged your living room furniture, scratches are an inevitable part of a floor’s life cycle.
The good news is that you rarely need to invest in a complete, expensive room sand and refinish to address common wear and tear. Most minor to moderate marks can be successfully managed right at home.
This comprehensive guide from Eheart Interior Solutions walks you through identifying your floor damage, matching it to the correct repair strategy, and ensuring your hardwood continues to look stunning for decades to come.
Step 1: Diagnose the Scratch Depth
Before reaching for any repair tools, you must accurately assess the severity of the damage. Treating a minor scuff with heavy duty wood putty can ruin the surrounding finish, while using a basic marker on a deep gouge will leave the structural damage completely exposed.
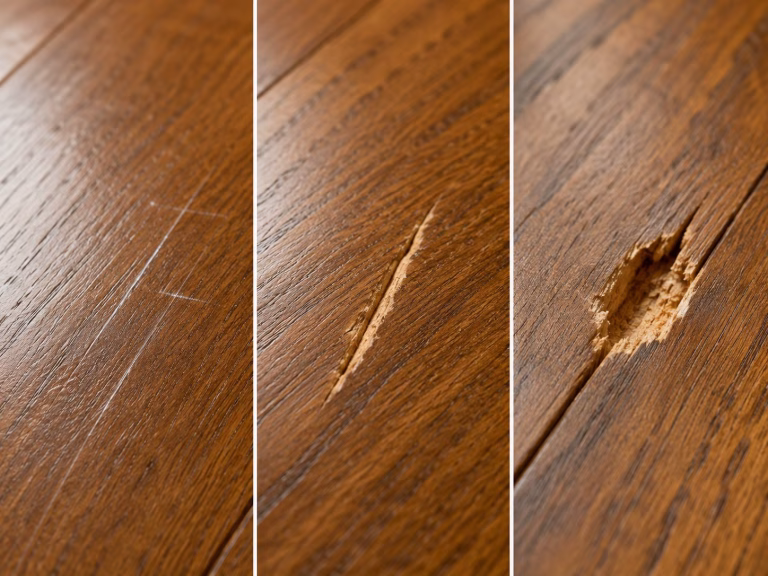
Wood flooring experts categorize scratches into three distinct levels:
Surface Scratches (Clear Coat Damage): These are light scuffs or hairline marks that only affect the clear protective topcoat (typically polyurethane). They often look white when light hits them, but the underlying wood color remains unchanged.
Moderate Scratches (Finish Penetration): These marks cut through the protective clear coat and slice into the stain or top layer of the wood itself. The scratch will display raw wood or a distinctly lighter color than the rest of the board.
Deep Gouges (Structural Damage): These occur when an object gouges deep into the actual wood plank, leaving a physical crater, valley, or split in the wood fibers.
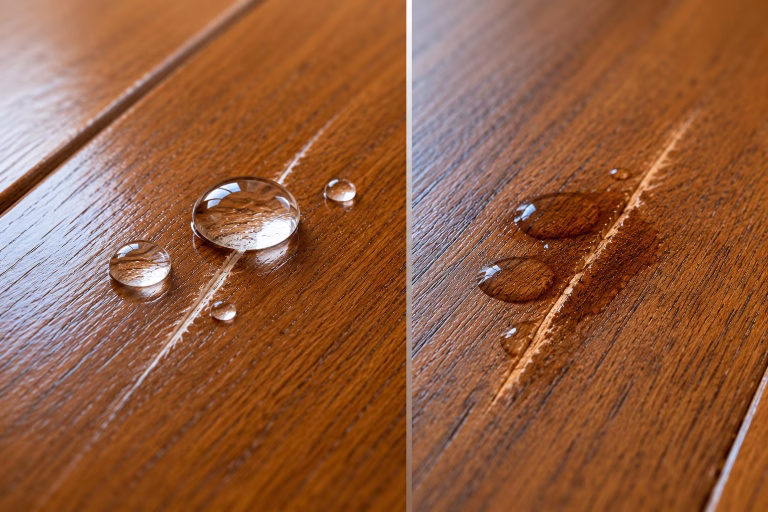
The Water Droplet Test
If you are unsure whether a scratch has breached the protective sealant, you can perform a quick diagnostic trick recommended by Basic Coatings. Clean the area and place a few drops of water directly onto the scratch. If the water beads up, your protective finish is intact, meaning you are dealing with a surface scratch. As detailed by 1-800-WATER-DAMAGE, if the water sinks in and turns the wood a darker color, the finish has been completely penetrated, exposing the raw wood beneath to environmental moisture.
Step 2: The Right Fix for Every Level of Damage
Once you have identified the depth of the scratch, select the appropriate repair workflow outlined below.ix
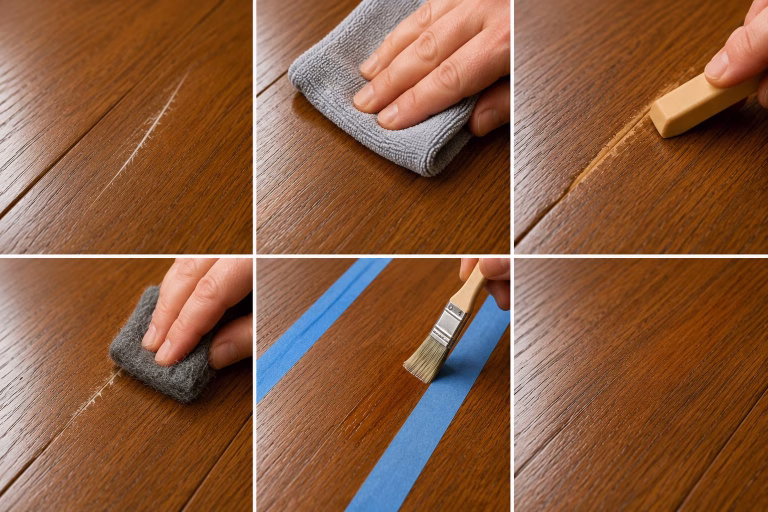
Method A: Erasing Surface Scratches and Scuffs
Because surface scratches have not damaged the wood fibers, your goal is simply to blend the clear coat back together or mask the white line.
Deep Clean: Clean the area thoroughly with a pH-neutral hardwood floor cleaner and a soft microfiber cloth. Leftover grit can act like sandpaper and worsen the damage during the buffing process.
The Balm or Wax Stick Method: For widespread superficial scuffs, old school solid repair sticks, such as a Tibet Almond Stick, work exceptionally well. Rubbing the solid formulation over the scuff moisturizes the finish and minimizes the white line effect.
The Buffing Fix: For polyurethane finishes, you can tape off the affected floorboard along its natural seams. Gently rub an ultra-fine abrasive pad or fine steel wool over the scratch, working exclusively along the direction of the wood grain as suggested by Enhance Floors & More. Wipe away the dust with a tack cloth, then apply a very thin layer of matching fresh DIY polyurethane topcoat using a small artist brush to restore the original sheen.
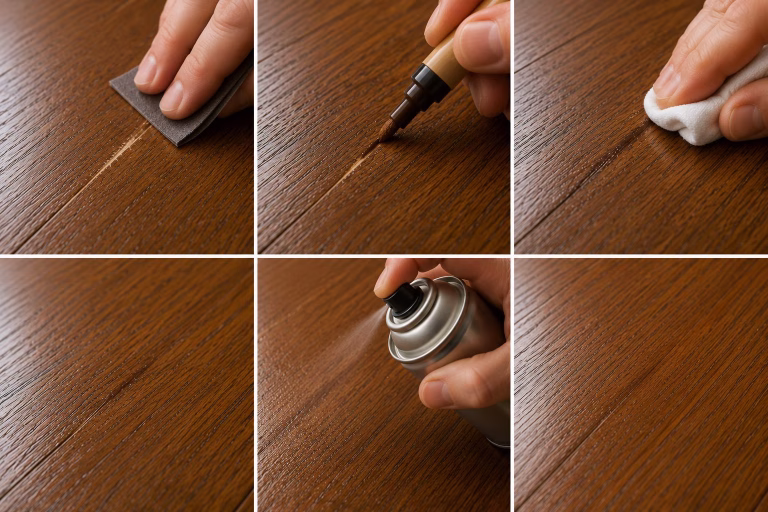
Method B: Mending Moderate Scratches with Color Matching
When the finish is gone and the wood color is altered, you must reintroduce pigment to make the scratch disappear into the surrounding grain patterns.
Prep the Line: Clean the scratch and lightly smooth any fraying wood edges using fine-grit sandpaper (180 to 220 grit). Always sand parallel to the wood grain.
Apply a Wood Repair Marker: Choose a high-quality wood stain marker that closely matches your floor’s dominant undertone. As noted by CALI Floors, combining or layering two different marker shades often yields the most natural look.
Blend Immediately: According to industry repair tutorials from Buff & Coat Hardwood Floor Refinishing, you should color inside the scratch line, then quickly use a clean cloth to buff away any excess stain from the undamaged surrounding floorboards before it dries on the clear coat.
Seal the Repair: Once the stain dries completely, seal the area with a clear spray or wipe-on polyurethane topcoat to prevent the new color from washing away during routine cleaning.fix
Method C: Rebuilding Deep Gouges with Wood Filler
A deep pit requires structural reconstruction to level the floor surface and prevent moisture from warping the floorboards.
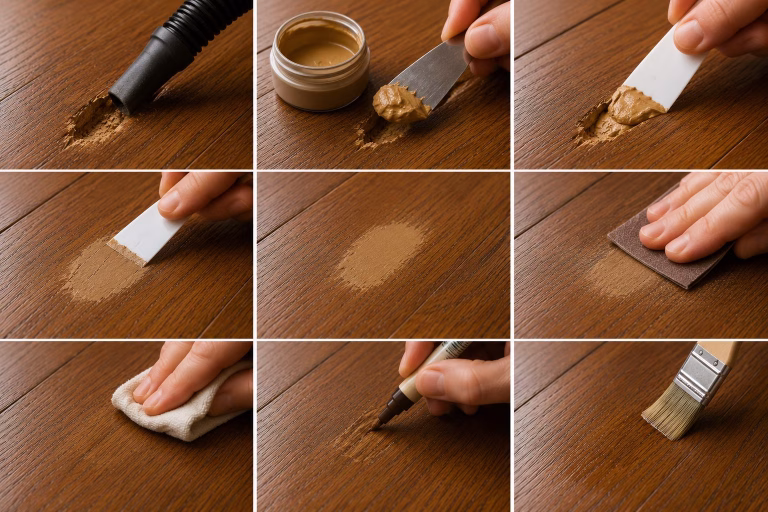
Clean Out Debris: Use a vacuum hose attachment to suck out any loose wood splinters, dirt, or dust trapped inside the gouge.
Select a Color-Matched Wood Filler: Pick a sandable, stainable wood filler or an epoxy wood putty designed specifically for hardwood. Keep in mind that wood fillers often shrink slightly as they dry, so choose a formula engineered for minimal shrinkage.
Press and Fill: Using a flexible plastic putty knife, press the filler firmly into the deep gouge. Overfill the valley slightly to account for minor settling and shrinkage.
Scrape and Level: Use the edge of your plastic putty knife or an old credit card to scrape away the excess wet filler surrounding the fix, keeping the patch flush with the floor surface.
Sand Flush: Allow the filler to cure completely according to the manufacturer’s directions (usually 2 to 6 hours). Once hardened, use 220-grit sandpaper to gently smooth the patch until it is perfectly flat, taking care not to sand the surrounding finish.
Stain and Seal: Clean away the fine dust with a tack cloth. Carefully apply your matching stain marker over the dried filler, let it dry, and then finish the patch with two thin coats of polyurethane to lock it in. If a board is too severely compromised for filler, total plank replacement may be required, as outlined by Flooret.
Proactive Habits to Prevent Future Floor Scratches
While knowing how to fix a scratch is incredibly valuable, stopping them before they start saves time and preserves the long term lifespan of your hardwood. Implement these simple structural habits in your home:
Implement a Strict No-Shoes Policy: Outdoor footwear carries microscopic rocks, concrete dust, and grit that act exactly like coarse sandpaper under the weight of your footsteps.
Invest in Premium Felt Protectors: Furniture legs are the leading cause of deep, sweeping gouges. Heavy-duty felt floor protectors, like those cataloged by Target, should be attached to the bottom of all chairs, couches, and tables. Check these pads every six months, as they compress and trap abrasive grit over time.
Keep Pet Nails Clipped: If you have dogs or cats, their claws can easily slice through standard residential clear coats. Keep nails trimmed short or consider using a nail grinder to smooth out sharp edges.
Use Breathable Area Rugs: Place high-quality runners or area rugs in high-traffic zones, such as entryways, main hallways, and directly underneath kitchen work stations. Ensure your rug backing material utilizes a protective, non-reactive rug pad, such as the breathable felt options found at The Home Depot, to avoid trapping moisture or causing chemical discoloration to the floor’s finish.
When to Call the Professionals
If your hardwood floors suffer from widespread scratching across an entire room, deep water staining, structural cupping, or if the finish is completely worn down to bare wood in heavy traffic lanes, DIY spot repairs will no longer suffice. As noted by LKV Flooring, advanced issues like severe mold, delamination, or widespread deep pet stains mean a simple patch won’t work.
In these scenarios, your home likely requires a professional buff and recoat or a full dustless sanding and refinishing cycle. The specialized team at Eheart Interior Solutions can assess your flooring health, match your existing species, and restore your hardwood to its original showroom glory.
